I know this blog has only been "open" for about a month, but we have already moved to a new domain: paper-it-fun.com
Why the move? For many reasons, but the number one reason is to be able to offer you more...more pictures, more content, and easier navigation (easier to find what you're looking for).
Anyway, if you like what you've read here, then hop on over to our new location and Discover all that can be done with PaperIllusion!
See ya over there. ;)
Sunday, May 13, 2007
Thursday, May 3, 2007
New Look for Paper Illusions Product Page
Ahh, I can breathe a sigh of relief. After many, many hours I finally finished upgrading the Paper Illusions product page at Wallpaper Illusions. For so long we had pictures of the patterns listed there but they were so tiny and for some reason the last time the page was upgraded (when we switched over to a new shopping cart), the pictures stopped being clickable...meaning you couldn't "click to enlarge". What a pain for those trying to get a good look at the color, huh.
Anyway, now you can click on each picture and see a bigger picture AND in many cases, a room shot of that particular pattern/color being used on a wall (or some other surface). Let me tell you, what a difference! It's so nice to see the colors in a real life situation, rather than little squares on a page. (click here to see an example)
Also, we've combined all the products into one place for each color. You pick the color you want, click "for more details" and boom, you have a selection of ordering a box, a case (at an additional savings), a mini-roll, an individual sample, or a complete sample pack (large or small) all right there. No need to click around to a bunch of different pages.
AND...phew, I've been busy, we've tacked on a Paper Illusions photo gallery at the bottom of the page as well (not as exhaustive as the one at Paper It Fun!). If you like one of the pictures, you click on it and it takes you to a blow-up of that same picture with a picture of the color used as well and the opportunity to purchase any of the products available in that color right there. How cool is that?
Really, how cool is that? I want to hear from you. I think it's great, but I'm the one who designed it (duh), so of course I'm a bit biased. But I would genuinely like to have your feedback. Check it out and then click on the "comments" link below and share away!
Turning Trash into Treasures with Paper Illusions!
 I'm excited to report we have added more pictures to our Paper Illusions Photo Gallery. A special thank you to Ginette for sharing them with me.
I had just finished updating the main product page at Wallpaper Illusions (which I'll tell you more about later), and I was reading through my email and got this wonderful testimonial from Ginette.
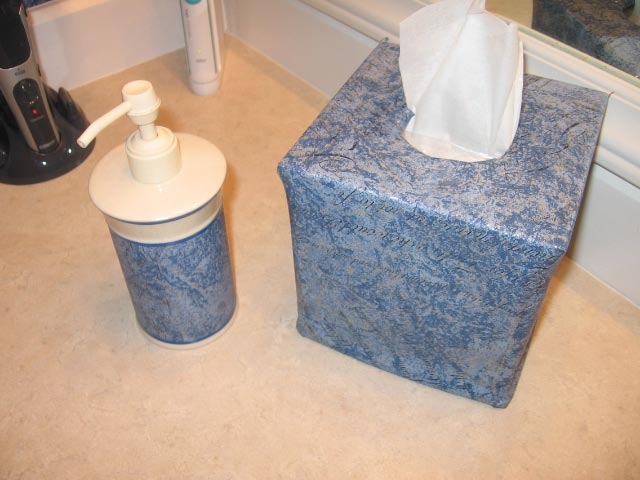
I discovered Paper Illusions about 3 years ago. I did both bathrooms in my condo with beautiful results. Having moved into a new house last year, I once again turned to Paper Illusions for my decorating needs...You can read more in the Photo Gallery, but what excited me so much was that she shared pictures of accessories she had done. I posted a project sheet on Turning Trash into Treasures just about a week or so ago, and while her accessories were far from trash, she had gotten creative and used the Paper Illusions to transform ordinary items into coordinating items to match her room's decor. Kudos!
Let me encourage you to:
- Pop on over to the gallery and see what she did
- Grab a copy of the project sheet, Turning Trash into Treasures
- Take out some of your leftover Paper Illusions from your last project -or- Pick up a Mini-Roll at Wallpaper Illusions and let your creative juices flow!
As always, have fun papering it!
Carrie
P.S. If you've already created some treasures, please tell me about them below...AND if you have pictures and would like to have them showcased in our photo gallery, please do share! ;)
Saturday, April 28, 2007
PaperIllusion Instructions
I've just learned that for some reason not every box of PaperIllusion that comes from Village contains instructions. While the box itself contains instructions on them (it's very simple...3 easy steps), many people like to have a piece of paper with how-to instructions printed on them.
Well, I gave the actual instructions that was included in all purchases of Paper Illusions in a blog post a while back, so if you didn't get a sheet in your box, you can still get them now. You can email the post to yourself by clicking the little envelope in the bottom right hand corner of the post with the arrow on it and print it out that way.
Click here for the Paper Illusion instructions.
I Hate Spam!
I just spent the last 30 minutes deleting users from our discussion forum that were blatant spammers. I'm 1/17th of the way through my list of "members" to comb through. What a pain!
If I accidentally delete you, I am very sorry. I am bleary-eyed at this point. I tried to err on the side of caution and keep the "members" that looked like regular people. But for the most part, if there was a link to a website on your profile and the website had anything to do with mortgages, casino games and rated R material, I deleted you.
Because of people like this, our forum had to basically shut down for several months because it was just way too much for me to moderate on my own. But after several conversations with my husband, he convinced me how valuable this forum is to people who are genuinely interested in the Paper Illusion product and what it could do for them, I had to find a way to make it work.
So, earlier this week, I upgraded the software to the newest version and implemented some security features. Now, anyone registering on the forum needs to fill out a field indicating they are a real person (and not some computer robot-thing-y) who can read a graphic. Also, I am personally reviewing every person who registers to see if they appear legit. Red flags for me are what I would consider inappropriate websites and email addresses that promote inappropriate material.
Eventually I'll make up a list of "unacceptable" words and load that into the software, so anyone trying to use those words in their profile or posts will not be permitted to do so.
Of course, this shouldn't effect anyone who is genuinely interested in what is being discussed at the forum, since we're not about mortgages, gambling and mature-marriage-practices. But if you happen to be in the mortgage business and are interested in Paper Illusions, please forgive me if I deleted you. Mortgage brokers are not bad people...it's just unfortunate that people who spam a lot happen to be spamming on behalf of mortgage companies.
Anyway, the forum is "open" for discussion again to new & registered users. Please bear with me as I finish "cleaning house". I'm on there everyday and there's plenty of people genuinely interested in discussing Paper Illusions and the projects that can and have been done, so feel free to join in! (Unless of course you're only interest is to sell mortgages, promote gambling and/or sexually explicit material...you guys can just take your keyboards and go take an ecourse on discussion forum etiquette.)
Tuesday, April 24, 2007
NEW! Paper Illusions Blog
I'm so glad to be able to bring to you our new blog. Now I have a new place to keep you all informed of what's happening in the world of PaperIllusion.
For those who have subscribed to Paper It Fun!, I will still email you with tips and project ideas every few weeks. But for those who want to be able to go someplace to find this information anytime, this blog's for you!
Some things you can expect to find here are:
So, I encourage you to share to your heart's content. Enjoy!
For those who have subscribed to Paper It Fun!, I will still email you with tips and project ideas every few weeks. But for those who want to be able to go someplace to find this information anytime, this blog's for you!
Some things you can expect to find here are:
- Project ideas & step-by-step instructions
- Product Information Updates (i.e. when something NEW comes on the scene or a color/pattern goes DISCONTINUED)
- Interviews with people in the PaperIllusion industry
- Tips & Testimonials from fellow PaperIllusion enthusiasts
- Special Promotions and Event Announcements
- and more...
So, I encourage you to share to your heart's content. Enjoy!
Discussion Forum being upgraded...
For a few months now I've been in a quandry as to what to do with our discussion forum. We were getting hit with so much SPAM that it was miserable trying to stay on top of it. Eventually I had to practically shut it down. I left it up for people to read because there's some great content in there, but I had to block everyone from posting. Of course, this put a HUGE damper on our community.
Well, a few weeks ago, it dawned on me that I could upgrade it. After all, it's been out there for several years and I know there were newer versions available. But, given the circumstances in my life I wasn't ready to try and figure out how to do it yet.
Then...last night, I had the bright idea of contacting customer support at phpbb for help, and lo and behold they helped me! I've had such bad luck with customer support staff on other web applications, I just expected to get the same kind of run around. But nope, a gentleman in the UK set me straight.
So, I'm working on upgrading the discussion forum at this time. There'll be some quirky things happening, but bear with me, I'll get it smooth going soon enough. I'm committed to see it through!
Some of the improved features include:
- Private Messaging
- Registration Process
- Search Capabilities
- Attachments: Users can post attachments (photos) themselves
- Reports: Users can report spammers!
- Mail/Print topics: Users can easily mail or print project instructions and other detailed posts
- Forum Subscriptions: Users can subscribe to forum categories...when a new project is posted, registered users can be contacted automatically.
- and more...
Paper Illusions Photo Gallery - UPDATED!
I'm excited to present MORE pictures submitted by our subscribers over the past few months! Thank you to all who have contributed. Be sure to check it out!
FEATURING:
FEATURING:
- PaperIllusion over laminate counter tops
- Paper Illusions photos used on QVC at initial product launch
- Kitchen & Dining Room Makeovers
- and more...
How to Hang Paper Illusions Wallpaper
PaperIllusion is the easy way to faux finish. This is a new and unique way to decorate your home.
Each design is first created by an artist and then printed on special prepasted, breathable paper to re-create the original, hand-painted look.
Due to the nature of the paper and the design, there may be slight color variations from one roll to the next. This is inherent to PaperIllusion and only enhances the beauty of the end result.
Preparation
Remove existing wallpaper. Walls must be smooth, clean, and free of mildew, grease and stain. Follow with an application of wallcovering primer/sealer.
Gather Tools
Smoothing tool, sponge, trim knife, water tray or bucket.
Coverage
85 square feet of PaperIllusion covers an 8' x 9' wall.
STEP 1
Begin by tearing paper randomly into irregular shapes. Tear larger peices first (approximately 8" x 12"), then smaller pieces as needed.
Start with straight-edge pieces. These shapes should be used along edges, ceiling lines, baseboards, doors and windows, to minimize trimming required.
STEP 2
Dip pieces of paper into warm water and make sure the entire pasted side is wet. Allow excess water to drip off into the water trays or bucket.
STEP 3
Apply to your primed wall or ceiling. Use your smoothing tool to remove excess water and wipe with a slightly moistened sponge. Place the second piece with its edges slightly overlapping the first piece, smooth and sponge firmly. Any remaining bubbles will disappear as the piece dries tight to the wall.
Easy to remove. Moisten with warm water repeating until pieces peel off.
Reprinted from instructions included with packaging of PaperIllusion product by Village.
Each design is first created by an artist and then printed on special prepasted, breathable paper to re-create the original, hand-painted look.
Due to the nature of the paper and the design, there may be slight color variations from one roll to the next. This is inherent to PaperIllusion and only enhances the beauty of the end result.
Preparation
Remove existing wallpaper. Walls must be smooth, clean, and free of mildew, grease and stain. Follow with an application of wallcovering primer/sealer.
Gather Tools
Smoothing tool, sponge, trim knife, water tray or bucket.
Coverage
85 square feet of PaperIllusion covers an 8' x 9' wall.
- Multiply length by height of each wall and add together
- Deduct for doors and windows to determine size of area to be covered
Now the fun begins with 3 Easy Steps!
STEP 1
Begin by tearing paper randomly into irregular shapes. Tear larger peices first (approximately 8" x 12"), then smaller pieces as needed.
Start with straight-edge pieces. These shapes should be used along edges, ceiling lines, baseboards, doors and windows, to minimize trimming required.
STEP 2
Dip pieces of paper into warm water and make sure the entire pasted side is wet. Allow excess water to drip off into the water trays or bucket.
STEP 3
Apply to your primed wall or ceiling. Use your smoothing tool to remove excess water and wipe with a slightly moistened sponge. Place the second piece with its edges slightly overlapping the first piece, smooth and sponge firmly. Any remaining bubbles will disappear as the piece dries tight to the wall.
It's that easy!
- Corners--when applying pieces in corners, gently press your smoothing tool into the corner to mold the paper to the corner.
- Trimming--to complete your project, use the smoothing tool and trim knife to trim around doorframes, windowsills, light switches, vanities, counter tops or even the pipes in your bathroom, as needed.
- Left over pieces--cover waste baskets, picture frames, lampshades, switchplate covers, etc to create a coordinated decor look.
Easy to remove. Moisten with warm water repeating until pieces peel off.
Reprinted from instructions included with packaging of PaperIllusion product by Village.
Subscribe to:
Comments (Atom)
